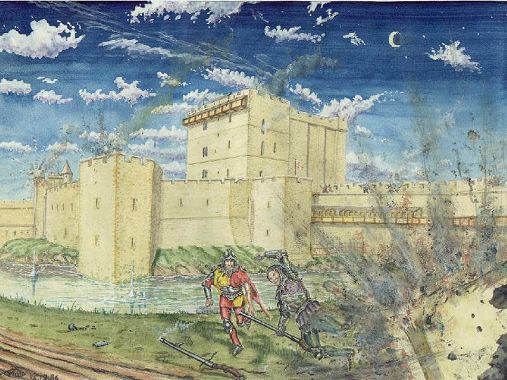
Norham Castle
Andrew Spratt contributes:
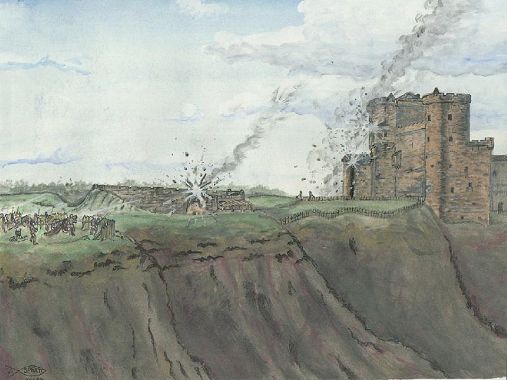
Today, some six miles south-west of Berwick, perched on
high cliffs above the river Tweed sits the great grey ruin of Norham
castle. With it's 'Norman' keep, double multi-towered inner and outer
courtyard walls and their encompassing ditches, still present a formidable
site. In it's heyday the castle's importance to the English was great,
being mentioned along with the likes of Berwick
and Roxburgh.
(both these castles though were technically 'Scottish' but illegally
occupied by 'English' garrisons.)
Norham was originally built by the Bishops of Durham in
the early 12th century as a wooden 'motte' tower and 'bailey' palisade.
But suffered destruction by the Scots and was replaced in 1157 by a stone
keep raised by King Henry II of England (1154-1189). In 1214 Norham was
attacked unsuccessfully by King Alexander II of Scots (1214-1249) for 40
days. King Robert the Bruce (1306-1329) also besieged the castle on three
separate occasions, in 1318,1319 and 1322 also to no avail. Eventually
Norham was stormed by the Scots in 1327. But under the terms of the peace
treaty signed at Edinburgh between the two nations, Norham was immediately
handed back to the English. The castle's courtyard defences then
progressively grew on into the 14th and 15th centuries, along with the
fame of it's alleged impregnability. Which was finally shattered in
1513,when King James IV of Scots (1488-1513) unleashed his super-cannon
'Mon's Meg' (now on display in Edinburgh castle) with her fiery sisters on
a 10 day bombardment, destroying both the inner and outer courtyard walls.
Much attention has been given to this siege prior to James's death at the
battle of Flodden 8 miles south of Norham. However, historians have
neglected to mention one of the Scots earlier attempts to take Norham not
by siege but by stealth and cunning.
In 1355 the Lothian Lords of Ramsay of Dalhousie
castle near Bonnyrigg, Halyburton of Dirleton
castle, Dunbar Earl of March of Dunbar castle and the Earl of Douglas of Tantallon
castle, with a contingent of visiting French Knights, gathered their
forces together in Duns wood near Nisbet, seven miles north-west of Norham
and twelve miles west of Berwick, to teach Lord Grey and the English
garrison of Norham a lesson for repeated raids into the borders.
The plan was simple. Ramsay with little more than 300
horsemen, would be sent ahead to burn the villages around Norham and steal
cattle to tease the garrison into pursuit. The English would only pursue
once they were convinced that Ramsay was on his own. So Halyburton, Dunbar
and Douglas would continue to hide in the woods until Ramsay hopefully
returned with the English at his heels right into the trap. Historians
have puzzled over the timing, precision and purpose of this Scots raid. As
it wasn't simply a regular ambush but was something greater, an attempt
even to attack Norham since only a token garrison would be left behind.
A possible theory of how they hoped to achieve this is
if the trap was sprung correctly with no escapees, once the encircled
English were engaged some of their banners could be stolen and used by
Douglas and the French contingent, whose horses were fresh, to ride back
into Norham castle under the pretense of being returning English Knights.
Halyburton and Dunbar would have sufficient forces to deal with the
English, saving rich Knights for ransom, before joining Douglas in the
sacking of Norham castle. This practice of using stolen banners was quite
a common tactic. For example, King Edward I of England (1272-1307) while
attacking Berwick
castle and besieging it's town walls in 1296, sent some of his horsemen
round to a postern gate flying captured Scots banners. They were
unwittingly given entry to the town resulting in a three day massacre of
almost the entire civilian population of Berwick. While the castle
garrison overlooking the town could do nothing. Later the castle was
stormed but the Scots garrison allowed to flee to carry news of the
massacre north in advance of Edward's invasion. Berwick was then colonised
by 'English' merchants and civilians eager to make their fortune from this
lucrative trading port.
Ramsay's sudden destructive arrival at Norham village
caused chaos. The terrified villagers with what livestock they could save,
flocked into the castle courtyard, while horns sounded and archers rushed
to the battlements firing indiscriminately into the village. The
drawbridge was quickly raised leaving the less agile villagers to fend for
themselves as the marauding, howling Scots circled the castle menacingly.
Ramsay torched the village taunting the garrison to come out and fight.
Lord Grey, the garrison commander and his ally Lord Dacre were suspicious
of Ramay's bold actions fearing another larger Scots army was nearby. So
scouts were sent out by a postern gate to check the immediate vicinity.
Meanwhile, Ramsay began filing stolen cattle across the
ford beside the blazing village. His rear guard took up a defensive
position in front of the castle in case a counter attack was imminent, but
no attack was forth coming. The rear guard then retired over the ford
rounding up loose cattle and gesturing defiantly towards the castle.
Grey's scouts returned, reporting no other armies in
the area. With great haste Grey and Dacre gathered together as many
horsemen as they could muster to pursue Ramsay who by this time was some
distance away. Ramsay's rear guard dragged their heels with some of the
cattle to tease the English on and on. As Grey and Dacre advanced, they
abandoned the cattle then fled rather convincingly in disarray. Grey's men
ignored the cattle since they could be collected later once these arrogant
Scots had been beaten. The rapid pursuit was on, over a six mile stretch
of reasonably even ground.
Just short of Duns wood, Ramsay's force stopped turning
to face the English. Many of Ramsay's men leapt from their exhausted
mounts preparing to fight on foot. Grey was delighted, confidently forming
his ranks up for an organized charge. When, suddenly, the call of hunting
horns sounded from the woods sending the forces of Halyburton, Dunbar and
Douglas cascading out on horseback and on foot to engage the bewildered
English. Undaunted, Grey and Dacre, who were professional soldiers could
do nothing but give battle fighting on several fronts at the same time.
As in all battles, things go wrong. John Halyburton of Dirleton
castle was killed in the Scots charge, distracting his men who flocked
round their dead master, thus allowing some of the English to escape
ending the ruse of using stolen banners to enter Norham. Dunbar and
Douglas pressed home the fight, Grey and Dacre were both unhorsed and
forced at sword's point to yield. With their leaders captive the rest of
the English surrendered.
Despite the sad loss of Halyburton, Douglas was
satisfied. They had failed to take Norham but had dealt a serious blow to
the English morale on the border. Lord Grey, his son and Lord Dacre could
all be ransomed for much gold. Lord Grey later spent two years in
Edinburgh castle before being released). Also, the English horses, arms
and armour could readily be used by the Scots. The stolen cattle were and
added bonus.
However, the lesser captive men-at-arms were of no
ransom value. Obviously, archers would have two of their fingers cut off,
ending their days as archers before being sent free. This, in itself, was
generous on Douglas's part considering his uncle the 'Good Sir James'
Douglas had a policy of giving captive archers a choice, lose their right
hand or their right eye for their freedom. While debating what to do, a
French Knight approached Douglas, buying most of these captives for a sum
of gold. He then took them to a nearby hill, known as 'slaughter hill'
where he systematically killed them one by one as retribution for the
murder of his father in France by the English. A sad end to what could
have been an honorable day of fighting.
NISBET,the aftermath.
When news of the defeat at Nisbet reached Berwick, the
English, instead of attempting a rescue of Lord Grey and his men,
inadvertently sent the majority of their troops from Berwick to Norham, as
they believed it to be in immediate danger from siege. At Lord Dunbar's
insistence the Scots who were hiding nearby assailed Berwick's town walls
by surprise. Unfortunately, they weren't quick enough to secure the
drawbridge between the town and the castle, before it was raised by the
alerted garrison. Unable to seize the castle, and against Douglas's
wishes, Dunbar took his frustrations out on the English civilians, looting
and burning Berwick town before fleeing when a large body of English
reinforcements suddenly appeared. This resulted in the burning of several
border villages in retaliation by the English, which had been foreseen by
Douglas. It was one thing to defeat soldiers in battle at Nisbet, which
could be respected. But to kill civilians wither English or Scots was
neither honorable or beneficial to either side. It merely perpetuated more
acts of senseless barbarism
|
|

